CG Hardscapes - Rochester, NY
  • HOME
    • About the Company
    • Installation Process
    • Warranty
  • CAREERS
  • BOOK NOW
  • Services
    • REMODELING
    • Hardscape
    • Landscape >
      • Plant Care
    • Composite Decks
    • Design
    • Masonry
    • Sound + Lighting
  • Portfolio
    • HGTV Dream Home 2022
    • Adirondack Heat - Victor, NY
    • Crescent Hill - Pittsford, NY
    • Rocky Glacial - Victor, NY
    • Evening Delight - Pittsford, NY
    • Timeless Treasure - Webster, NY
    • Ember Elegance - Pittsford, NY
    • Testimonials

ICPI Certified Installers

Picture
CG Hardscapes is one of the few companies who is certified through the Interlocking Concrete Pavement Institute. It is important to make sure your contractor is ICPI certified so that they are aware of all the aspects of installing a proper flexible pavement system. An ICPI certified installer is on every job and is there to make sure things go smoothly. An ICPI certified installer is essential for larger projects such as outdoor living areas, around pools, fire pits, and kitchens.

Soil Testing / Amendment

It is important to make sure that your soil type has been properly identified by our estimator to determine if any amendments need to be made chemically or mechanically.  A proper foundation built on a compacted soil subsurface is the first and most important step to guarantee a lifetime of use. This will prevent water pooling and absorption in very clay like soils. We always perform 3 tests to determine all necessary adjustments before we lay our gravel base; The patty test, the snake test, and the tennis ball test.

Density / Compaction Testing

After the soil type has been determined we can evaluate the thickness of compacted aggregate base needed. The base thickness varies depending on the application, but in determining the soil type, we can save our customers money since the base might not need as much material. After we determine thickness of base we use our vibratory plate compactors to attain the proper base density levels to sustain the load on top. We always reach a 98% Standard Proctor Density with our patio bases.
Picture

PATIOS

  • Excavation

Excavation will begin prior to the delivery of product materials. We excavate to -10in below finished grade with a 10in over-dig. We try our best to minimize damage to the yard while using our mini-excavator and bobcat to dig out and remove the existing area where the patio will be installed. We finally determine if any soil amendments need to be made to guarantee a solid subsoil base and make necessary adjustments.


  • Base Preparation

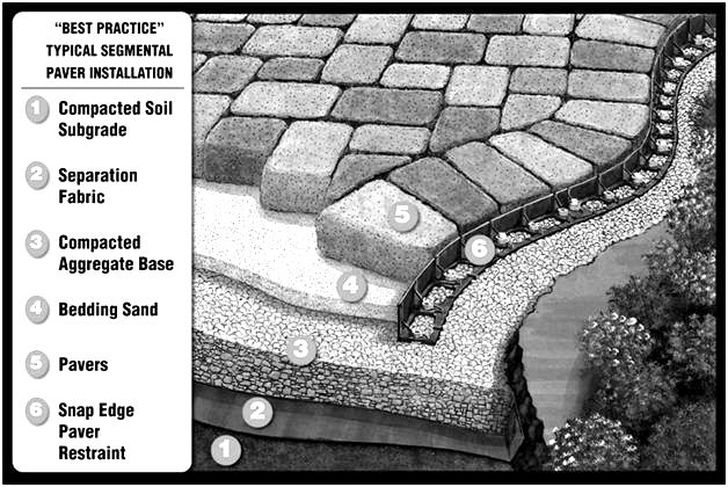
After the area has been excavated we will install our geotextile fabric on the compacted subsoil base, wrapping up along the edges of the patio area. We ensure that there are as little wrinkles as possible to prevent future sinking or low spots from occurring. We then install 6-8in of CR1 Aggregate base stone and compact using a 5,000-6,000lb vibratory plate compactor in 2-3in lifts ensuring the base is properly compacted.


  • Paver Installation

Before installation of the pavers, we screed 1-1 ½ inch of washed mason sand using a pitch of 1/8-1/4in over each foot of patio space. For example 8ft = 1-2in of patio slope. Some pitches may need to be greater in certain areas to ensure proper drainage. This sand allows for proper drainage through the paver patio system and helps lock the pavers with the jointing sand. We then lay our pavers in a random pattern (or one decided with our customer) and make the necessary cuts to complete the submitted design. 


  • Finishing

After the patio pavers have been cut to the final dimensions, we use a weather resistant plastic snap-edge patio restraint around the exterior to prevent the patio from shifting outward. The edge restraints are staked into the ground using 12in non-galvanized spikes to prevent them from pushing up out of the ground. When the snap edge is in place, we sweep in the polymeric joint sand into the patio pavers so that the sand is 1/8in from the top of the paver block. We use a plate compactor again to address any inconsistencies in the patio and to make sure the sand has fully worked its way in to the joints. We will then use the technique with our hose to water the patio and activate the sand. Finally we will finish grading the exterior of the patio with topsoil and seed.

SIDEWALKS

  • Excavation

Excavation will begin prior to the delivery of product materials. We excavate to -8in below finished grade with a 8in over-dig. We try our best to minimize damage to the yard while using our mini-excavator and bobcat to dig out and remove the existing area where the patio will be installed. We finally determine if any soil amendments need to be made to guarantee a solid subsoil base and make necessary adjustments.


  • Base Preparation

After the area has been excavated we will install our geotextile fabric on the compacted subsoil base, wrapping up along the edges of the patio area. We ensure that there are as little wrinkles as possible to prevent future sinking or low spots from occurring. We then install 4-6in of CR1 Aggregate base stone and compact using a 5,000-6,000lb vibratory plate compactor in 2-3in lifts ensuring the base is properly compacted.


  • Paver Installation

Before installation of the pavers, we screed 1-1 ½ inch of washed mason sand using a pitch of 1/8-1/4in over each foot of patio space. For example 8ft = 1-2in of patio slope. This sand allows for proper drainage through the paver patio system and helps lock the pavers with the jointing sand. We then lay our pavers in a random pattern (or one decided with our customer) and make the necessary cuts to complete the submitted design.


  • Finishing

After the patio pavers have been cut to the final dimensions, we use a weather resistant plastic snap-edge patio restraint around the exterior to prevent the patio from shifting outward. The edge restraints are staked into the ground using 12in non-galvanized spikes to prevent them from pushing up out of the ground. When the snap edge is in place, we sweep in the polymeric joint sand into the patio pavers so that the sand is 1/8in from the top of the paver block. We use a plate compactor again to address any inconsistencies in the patio and to make sure the sand has fully worked its way in to the joints. We will then use the technique with our hose to water the patio and activate the sand. Finally we will finish grading the exterior of the patio with topsoil and seed.
  • POOLS

For installations around pools, we like to have a minimum of 8-10in of CR1 aggregate base stone with a 12in excavation and over-dig. We also install a foam expansion tube between the pavers and the concrete skirt around the pool to allow for freeze-thaw conditions to have flexibility compared to the rigidity of the concrete slab. Center drains are also typically used which will make the water flow from high points to the proper drainage areas.

Picture
Picture
Project Consultation

585-576-3766

Webster, NY
Rochester, NY

sales@cghardscapes.com

 © 2021-2023 CG Hardscapes & Landscape Design - a partner of Cadre Curbing, LLC. All rights reserved. 
  • HOME
    • About the Company
    • Installation Process
    • Warranty
  • CAREERS
  • BOOK NOW
  • Services
    • REMODELING
    • Hardscape
    • Landscape >
      • Plant Care
    • Composite Decks
    • Design
    • Masonry
    • Sound + Lighting
  • Portfolio
    • HGTV Dream Home 2022
    • Adirondack Heat - Victor, NY
    • Crescent Hill - Pittsford, NY
    • Rocky Glacial - Victor, NY
    • Evening Delight - Pittsford, NY
    • Timeless Treasure - Webster, NY
    • Ember Elegance - Pittsford, NY
    • Testimonials